Definition: To write entries in, add material to, or maintain a weblog, hence blog. Blogging has become yet another form of communication via the internet. There are blogs on every subject you can imagine: sports, crafts, business, politics, personal family histories, etc. There are a few platforms for blogging: Blogger, Wordpress, and Typepad. I will be referring to Blogger in our discussion as is a very user-friendly platform powered by Google. There probably are the most tutorials and free stuff on the internet for Blogger, AND is the one I personally use.
What Can I Do With A Blog?
The only answer I can give is what can’t you do with a blog?! Family History is my main focus. I set up my blog to document our family and share the events in our life with family and friends. But, there are other ways to blog:
Digitalhotspot.blogspot.com (teach a skill)
Musingofbookworms.blogspot.com (more than one person can contribute to a blog)
Blogsandblings.blogspot.com (provide a service)
Chicobluereview.com (commentary)
Sewmamasew.com/blog2 (creative outlets)
How Much Time Does Blogging Take?
While blogging is quite simple to start, you will have to invest in some time to learn how to navigate your site. My mother started blogging nine months ago. She doesn’t consider herself a computer expert, but within a week of playing around with it, she felt comfortable with the process. Set aside some time to work with your blog and play with all the options. Don’t be afraid to ask questions or watch a tutorial.
Is My Personal Information at Risk?
One of the options available is to make your blog public or private. Making your blog private requires you to enter email addresses for anyone you allow to view your blog. Individuals who elect to keep their blogs public, eliminate personal information from their entries and their profiles.
How Do I Get Started?
 STEP 1: Once on your internet, go to http://www.blogger.com/. Click “Create A Blog”. On this page you can also access a tour and a video tutorial under the “Learn More” topic.
 STEP 2: Set up a Google Account. This does not require you to have a gmail account. You can use your current email address. Your password does not have to be your email password. Your display name will be the name that appears with each of your posts. You can use your first name or make up something. Mine is “Digi Loves Company”.
 STEP 3: What is in a name? Believe it or not, there are thousands of blogs out there. That means there are thousands of names already taken. The circled area is where you will put your name and check to see if you can use it. Type in the name and click “Check Availability”. Once you have found one you like fill in blog title and word verification, then click continue.
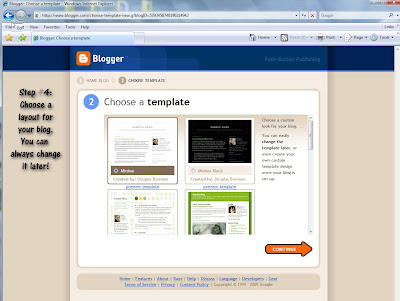
 STEP 4: Now comes some fun stuff – picking out a look for your blog. Use the scroll bar on the right hand side to view all the templates available. Click on a bubble to select the template you like, then click continue.
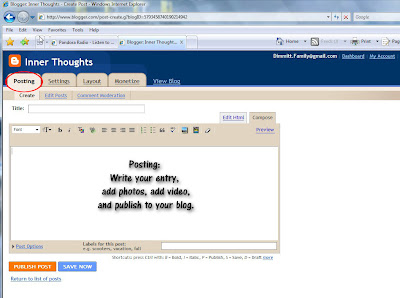
  POSTING: This is the screen you will see when you are posting an entry to your blog. There are some basic features in this box for adding photos, video (this takes a LONG time), or changing the look/orientation of your text. When you are finished creating your post, click “Publish Post” at the bottom. Now your post will appear on your blog!
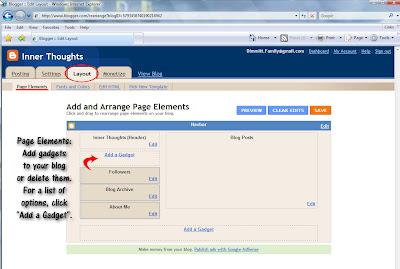
  LAYOUT/Page Elements: This screen allows you to play with the format of information on your blog. You can add gadgets to the top/side/bottom areas of your blog. If you click on “Add a Gadget”, a list of options are displayed. You can remove or add them at anytime. If this section feels too overwhelming, wait until you are more comfortable with the process before venturing on.


0 comments:
Post a Comment